Provider Broadvox (USA)
- 1 Broadvox.com
- 2 Purpose, Scope, and Audience
- 3 FreeSWITCH Deployment Information
- 4 Configuring FreeSWITCH
Broadvox.com
Purpose, Scope, and Audience
This technical application note describes the configuration of FreeSWITCH for the Broadvox GO! SIP Trunking service on the Fusion platform. This document is suitable for use by anyone deploying the Broadvox GO! SIP Trunking service in conjunction with FreeSWITCH. This document has a technical audience in mind – specifically IT professionals skilled in Linux with some experience in PBX administration and familiarity with VoIP technologies. This document is not for business administrators or people in other non-technical careers. In order to successfully use this document to deploy Broadvox GO! SIP Trunking service, you will need to possess the following skills, or have access to professionals or consultants with the following skills:
- Understanding of UNIX or Linux operating systems, including:
- Understanding of file and directory structure on target OS
- Understanding of firewall configuration on target OS
- Understanding of network configuration on target OS
- Understanding of service configuration on target OS
- Familiarity with network troubleshooting tools, including:
- Wireshark/Ethereal
- dig/nslookup
- ping
- traceroute
- Familiarity with PBX systems, including:
- Trunk configuration
- Calling plan configuration
- Extension configuration
- Mailbox configuration
- Familiarity with Session Initiation Protocol (SIP)
- An understanding of all seven layers of the Open System Interconnection (OSI) model
- A complete understanding of your internal network structure, Network Address Translation (NAT) setup, and firewall setup
- A complete understanding of your public Internet connectivity
Broadvox can only provide support for FreeSWITCH to the extent covered in this Technical Application Note and the included reference configuration, so if your level of technical expertise does not include the above skills, it is recommended that you obtain the services of a FreeSWITCH professional.
FreeSWITCH Deployment Information
Before you begin deploying FreeSWITCH, please locate the following information. If you have questions about any item, refer to the descriptions and additional details provided on the pages that follow.
External IP Address or DNS: ________________________
Preferred Codec: PCMU g729
Alternate Codec: PCMU g729 none
Is FreeSWITCH NATd: Yes No
Is FreeSWITCH Behind a Firewall: Yes No
Is There a Local Firewall: Yes No
FreeSWITCH External IP Address
Your FreeSWITCH server will either use a public IP address or a private IP address. If the IP address on your FreeSWITCH server is of the form 192.168.x.x, 172.16.x.x – 172.31.x.x, or 10.x.x.x, then your FreeSWITCH server uses an internal, private IP address. This internal address is not routable on the public Internet. In order for your FreeSWITCH server to connect to the Broadvox Session Border Controller, you must either have a public IP address on your FreeSWITCH server or you must translate your private IP address into a public IP address using a Network Address Translator (NAT).
If your FreeSWITCH server is behind a NAT, your public IP address will typically be the public IP address of your NAT. You may also have a static, one-to-one mapping of a public IP address to your private IP address. In this case, your public IP address will not match the IP address of your NAT, but you can look up the correct public IP address in your NAT configuration. If in doubt, you can perform a network packet capture using Wireshark (previously called Ethereal) on the public side of your NAT while simultaneously issuing some form of Internet request on your FreeSWITCH server.
Sending Calls to Broadvox
In your Welcome letter, Broadvox provides DNS records to which you may send calls, and from which you should be prepared to receive calls. FreeSWITCH supports DNS A records, DNS SRV records, and IP addresses.
At the top of your technical welcome letter, you will see a table like this one which shows your account number, turn-up ticket number, and trunk number. This information should be provided to Broadvox when you call for assistance to expedite support

The third page of the welcome letter contains a table of the IP addresses and ports you need to allow through your firewall. Your firewall should be configured to accept signaling and media from these IP address and port combinations.
The third page also contains the IP address and DNS information you should use for configuring your trunk. Broadvox recommends you utilize the DNS A record entries for FreeSWITCH unless you have specific reasons not to.
Also on the third page, you will find a section containing information about how your trunk is configured on the Broadvox side. You should carefully review this information to ensure it is configured properly.

The 'Admin E-mail' lists the E-mail address which will receive alerts from the Broadvox SIP Trunking (Fusion) platform when various recognizable events occur. These events include things such as calls being blocked because they would cause you to exceed the simultaneous call sessions you purchased.
FreeSWITCH has been tested to support TLS and SRTP with some more technically advanced configuration changes.
Finally, on the fourth page, you will find two sections that specify how Broadvox is configured to send calls to your FreeSWITCH box and how Broadvox is configured to receive calls from your FreeSWITCH box. These two sections are only utilized if you provided static IP address information or DNS information. Broadvox can send calls to entirely separate systems from the ones it is configured to receive calls from. This allows you to split your inbound and outbound traffic for any reason you may have, including but not limited to load distribution over several systems or multiple Internet connections. In addition, Broadvox can randomly load-balance calls across several systems using an identical priority for the Send-To records. These options should allow you to engineer your traffic flow to suite your particular needs.

SRV Records
Service records (SRV) are a form of Domain Name System (DNS) record. They contain information about where to send requests for a particular service offered at a specific domain. In the case of Broadvox GO! SIP Trunking, they provide the IP addresses, port numbers, and preferences to use for sending SIP calls over UDP, TCP, and TLS to Broadvox. The SRV location to use for sending calls to Broadvox for each of your trunk groups is in your Welcome letter.
Testing SRV Records
Most Broadvox GO! SIP Trunking customers like to ensure the DNS entries are functioning or they like to look up the actual IP addresses. In a Windows environment, you can perform the SRV query using the nslookup command at a command prompt, as shown in Figure 6.
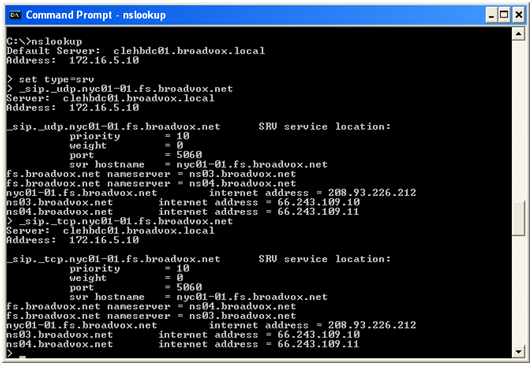
As you can see, a SRV record consists of a service type definition (_sip), a transport definition (_udp), and the domain (nyc01-01.fs.broadvox.net). FreeSWITCH will automatically add the service and transport definitions as a prefix to the domain before performing the query. The query returns a priority, weight, port and hostname for each entry. The query also returns the “A record" entries for each hostname, which provides the IP address for each host.
In a UNIX or Linux environment, you can perform a query on the Broadvox SRV records using the dig command:
$ dig srv _sip._udp.nyc01-01.fs.broadvox.net

; <<>> DiG 9.3.4-P1 <<>> srv _sip._udp.nyc01-01.fs.broadvox.net
;; global options:  printcmd
;; Got answer:
;; ->>HEADER<<- opcode: QUERY, status: NOERROR, id: 26443
;; flags: qr rd ra; QUERY: 1, ANSWER: 1, AUTHORITY: 2, ADDITIONAL: 1

;; QUESTION SECTION:
;_sip._udp.nyc01-01.fs.broadvox.net. IN SRV

;; ANSWER SECTION:
_sip._udp.nyc01-01.fs.broadvox.net. 600 IN SRV  10 0 5060 nyc01-01.fs.broadvox.net.

;; AUTHORITY SECTION:
fs.broadvox.net.        600     IN      NS      ns03.broadvox.net.
fs.broadvox.net.        600     IN      NS      ns04.broadvox.net.

;; ADDITIONAL SECTION:
nyc01-01.fs.broadvox.net. 600   IN      A       208.93.226.212

;; Query time: 95 msec
;; SERVER: 10.128.6.4#53(10.128.6.4)
;; WHEN: Thu Jul 30 13:59:26 2009
;; MSG SIZE  rcvd: 150
Preferred and Alternate Codecs
Broadvox allows you to select preferred and alternate codecs to simultaneously meet your bandwidth requirements and provide greater end-to-end support. In the event that your destination party or your destination party’s carrier cannot support your preferred codec or alternate codecs, Broadvox will automatically transcode your call to a supported codec.
When configuring codecs, please keep in mind that G.711 μLaw (PCMU) consumes approximately 87.2 Kbps of bandwidth per simultaneous call over Ethernet. G.729 Annex A (g729) will consume approximately 31.2 Kbps of bandwidth per simultaneous call over Ethernet. Also, keep in mind that G.711 offers superior call quality when compared to G.729, but only if you have enough bandwidth to support all of your simultaneous calls.
Is FreeSWITCH NATd
If your FreeSWITCH server uses an Internet-facing IP address of the form 192.168.x.x, 172.16.x.x – 172.31.x.x, or 10.x.x.x, then it is almost certainly behind a Network Address Translation (NAT) device. If your server uses an address of that form and is not behind a NAT, then it has no connectivity to the Internet. Even if your server uses an IP address that does not match the forms above, it is still possible (though very unlikely) that it is behind a NAT. If FreeSWITCH is behind a NAT, you may need to perform port forwarding, set up a DMZ host or configure a one-to-one static IP map.
Is FreeSWITCH Behind a Firewall
If FreeSWITCH is behind a NAT, then it is almost certainly behind a firewall. It is also possible that FreeSWITCH uses a public IP address but is still behind a firewall. If you use a Cisco PIX, SonicWALL, Shorewall, Firebox, or any other brand of firewall, you may need to perform additional configuration steps on the firewall device to allow FreeSWITCH to function properly. Additionally, you may be using an Application Gateway such as an Ingate SIParator. These devices will also need additional configuration to allow FreeSWITCH to function properly. Configuring your firewall or application gateway is beyond the scope of this document. In general, you will need to allow UDP port 5060 in both directions, as well as UDP ports 1024 to 65535 for RTP.
Is There a Local Firewall
In addition to being behind a firewall, it is also possible that the FreeSWITCH server itself utilizes a local firewall. Typically, FreeSWITCH is deployed on a UNIX or Linux operating system. These systems usually come with a firewall program installed, like iptables. If your server uses iptables, you can check to see if there are any rules in place by issuing the following commands:
$ iptables -L -v -n

Chain INPUT (policy ACCEPT 3549M packets, 4907G bytes)
 pkts bytes target     prot opt in     out     source               destination

Chain FORWARD (policy ACCEPT 0 packets, 0 bytes)
 pkts bytes target     prot opt in     out     source               destination

Chain OUTPUT (policy ACCEPT 688M packets, 51G bytes)
 pkts bytes target     prot opt in     out     source               destination

$ iptables -L -v -n -t nat

Chain PREROUTING (policy ACCEPT 1836K packets, 118M bytes)
 pkts bytes target     prot opt in     out     source               destination

Chain POSTROUTING (policy ACCEPT 2247K packets, 136M bytes)
 pkts bytes target     prot opt in     out     source               destination

Chain OUTPUT (policy ACCEPT 2247K packets, 136M bytes)
 pkts bytes target     prot opt in     out     source               destination

$ iptables -L -v -n -t mangle

Chain PREROUTING (policy ACCEPT 3551M packets, 4907G bytes)
 pkts bytes target     prot opt in     out     source               destination

Chain INPUT (policy ACCEPT 3549M packets, 4907G bytes)
 pkts bytes target     prot opt in     out     source               destination

Chain FORWARD (policy ACCEPT 0 packets, 0 bytes)
 pkts bytes target     prot opt in     out     source               destination

Chain OUTPUT (policy ACCEPT 688M packets, 51G bytes)
 pkts bytes target     prot opt in     out     source               destination

Chain POSTROUTING (policy ACCEPT 688M packets, 51G bytes)
 pkts bytes target     prot opt in     out     source               destination
The output shown above indicates that there are no firewall rules configured on this server. If you are using a different type of firewall software on your FreeSWITCH server, you will need to consult the documentation for that software to learn how to check whether it is enabled. If you have a local firewall enabled, you will need to configure it to allow the appropriate ports, as described in “Is FreeSWITCH Behind a Firewall".
If you are using a standard iptables firewall setup, such as the one on Red Hat Enterprise Linux, CentOS, Gentoo Linux, or Slackware Linux, these rules may be of use to you in allowing the appropriate traffic from the Broadvox Fusion platform:
# Allow SIP over UDP, TCP, and TLS:
iptables -I INPUT -p udp --dport 5060 -s 208.93.224.224/28 -j ACCEPT
iptables -I INPUT -p tcp --dport 5060 -s 208.93.224.224/28 -j ACCEPT
iptables -I INPUT -p tcp --dport 5061 -s 208.93.224.224/28 -j ACCEPT
iptables -I INPUT -p udp --dport 5060 -s 208.93.226.208/28 -j ACCEPT
iptables -I INPUT -p tcp --dport 5060 -s 208.93.226.208/28 -j ACCEPT
iptables -I INPUT -p tcp --dport 5061 -s 208.93.226.208/28 -j ACCEPT
iptables -I INPUT -p udp --dport 5060 -s 208.93.227.208/28 -j ACCEPT
iptables -I INPUT -p tcp --dport 5060 -s 208.93.227.208/28 -j ACCEPT
iptables -I INPUT -p tcp --dport 5061 -s 208.93.227.208/28 -j ACCEPT
# Allow media:
iptables -I INPUT -p udp --dport 1024:65535 -s 208.93.224.224/28 -j ACCEPT
iptables -I INPUT -p udp --dport 1024:65535 -s 208.93.226.208/28 -j ACCEPT
iptables -I INPUT -p udp --dport 1024:65535 -s 208.93.227.208/28 -j ACCEPT
iptables -I INPUT -p udp --dport 1024:65535 -s 64.158.162.71 -j ACCEPT
iptables -I INPUT -p udp --dport 1024:65535 -s 64.158.162.100 -j ACCEPT
iptables -I INPUT -p udp --dport 1024:65535 -s 64.152.60.71 -j ACCEPT
iptables -I INPUT -p udp --dport 1024:65535 -s 64.152.60.164 -j ACCEPT
iptables -I INPUT -p udp --dport 1024:65535 -s 209.249.3.71 -j ACCEPT
iptables -I INPUT -p udp --dport 1024:65535 -s 209.249.3.81 -j ACCEPT
iptables -I INPUT -p udp --dport 1024:65535 -s 64.156.174.71 -j ACCEPT
iptables -I INPUT -p udp --dport 1024:65535 -s 208.93.227.5 -j ACCEPT
iptables -I INPUT -p udp --dport 1024:65535 -s 208.93.226.5 -j ACCEPT
Please note, you may not be able to copy and paste these directly into a terminal program like SecureCRT, PuTTY, ZOC, etc. You may need to paste into Notepad or a similar text-only editor, and then copy and paste from there into the terminal program. This extra step should eliminate any hidden formatting characters that get copied along with the text (typically only applies when performing the copy and paste on a Microsoft platform).
Any rules you insert into iptables must be loaded each time the FreeSWITCH server restarts. There are typically two methods to accomplish this. The first (and usually preferred) method is to use the iptables save and restore functionality. On most platforms, you can simply issue one of these two commands:
/etc/init.d/iptables save
/etc/rc.d/iptables save
The second method is to use a start-up script to re-issue the commands that add the rules. Generally, you would create a file in /etc/init.d or the appropriate /etc/rc.d directory (based on your individual platform) that contains the commands to create the rules. You would then chmod the file so that it is executable. Next, you would either create a symbolic link in the appropriate /etc/rc.d directory, or you would add it to your ‘local’ script which is responsible for executing any custom start-up commands.
If you require any further assistance in modifying your local firewall, please consult the documentation appropriate for your OS distribution and firewall program.
Configuring FreeSWITCH
Please note that these configuration examples are presented only as a guide and do not constitute a complete FreeSWITCH configuration. In addition, they may contain errors or omissions.
If you require additional assistance configuring FreeSWITCH, you may be able to obtain additional support using the FreeSWITCH IRC channel. The FreeSWITCH developers, as well as many FreeSWITCH experts and consultants, are available on the #freeswitch IRC channel on irc.freenode.net during normal business hours. The FreeSWITCH developers also provide support contracts through http://www.freeswitchsolutions.com/.
After building and installing FreeSWITCH, you must configure it to use the Broadvox "Fusion" SIP Trunking platform. You will need to start by configuring your Sofia SIP profile so that it will speak to the Broadvox Fusion platform using the correct protocols and options. This is a summary of the primary parameters that need to be set on your SIP profile (on Linux, this is typically located in /usr/local/freeswitch/conf/sip_profiles):
<profile name="broadvox">
  <gateways>
    <X-PRE-PROCESS cmd="include" data="broadvox/*.xml"/>
  </gateways>
  <settings>
    <param name="context" value="broadvox-in"/>
    <param name="rfc2833-pt" value="101"/>
    <param name="codec-prefs" value="PCMU,G729"/>
    <param name="inbound-codec-negotiation" value="greedy"/>
    <param name="unregister-on-options-fail" value="true"/>
    <param name="pass-rfc2833" value="true"/>
    <param name="inbound-late-negotiation" value="true"/>
    <param name="nonce-ttl" value="60"/>
    <param name="auth-calls" value="false"/>
    <param name="rtp-timeout-sec" value="300"/>
    <param name="rtp-hold-timeout-sec" value="1800"/>
    <param name="challenge-realm" value="auto_from"/>
  </settings>
</profile>
After modifying your Sofia SIP profile, you must define gateways to the Broadvox Fusion platform for each city specified in your welcome letter. Start by making a directory to hold the gateway information:
cd /usr/local/freeswitch/conf/sip_profiles
mkdir broadvox
Then create an XML file for each city-based gateway:
vim dfw01-01.fs.broadvox.net.xml
vim lax01-01.fs.broadvox.net.xml
vim nyc01-01.fs.broadvox.net.xml
The contents of these files should look like this:
<!-- This is dfw01-01.fs.broadvox.net.xml -->
<include>
  <gateway name="dfw01-01">
  <param name="username" value="your_btn_goes_here"/>
  <!--<param name="from-domain" value="your_public_ip_or_dns_goes_here"/>-->
  <param name="password" value="your_password_goes_here"/>
  <param name="proxy" value="dfw01-01.fs.broadvox.net"/>
  <!--/// expire in seconds: *optional* 3600, if blank ///-->
  <!--<param name="expire-seconds" value="300"/>-->
  <!--/// do not register ///-->
  <param name="register" value="false"/>
  <!--<param name="retry-seconds" value="30"/>-->
  <param name="ping" value="25"/>
  </gateway>
</include>
<!-- End of dfw01-01.fs.broadvox.net.xml -->


<!-- This is lax01-01.fs.broadvox.net.xml -->
<include>
  <gateway name="lax01-01">
  <param name="username" value="your_btn_goes_here"/>
  <!--<param name="from-domain" value="your_public_ip_or_dns_goes_here"/>-->
  <param name="password" value="your_password_goes_here"/>
  <param name="proxy" value="lax01-01.fs.broadvox.net"/>
  <!--/// expire in seconds: *optional* 3600, if blank ///-->
  <!--<param name="expire-seconds" value="300"/>-->
  <!--/// do not register ///-->
  <param name="register" value="false"/>
  <!--<param name="retry-seconds" value="30"/>-->
  <param name="ping" value="25"/>
  </gateway>
</include>
<!-- End of lax01-01.fs.broadvox.net.xml -->


<!-- This is nyc01-01.fs.broadvox.net.xml -->
<include>
  <gateway name="nyc01-01">
  <param name="username" value="your_btn_goes_here"/>
  <!--<param name="from-domain" value="your_public_ip_or_dns_goes_here"/>-->
  <param name="password" value="your_password_goes_here"/>
  <param name="proxy" value="nyc01-01.fs.broadvox.net"/>
  <!--/// expire in seconds: *optional* 3600, if blank ///-->
  <!--<param name="expire-seconds" value="300"/>-->
  <!--/// do not register ///-->
  <param name="register" value="false"/>
  <!--<param name="retry-seconds" value="30"/>-->
  <param name="ping" value="25"/>
  </gateway>
</include>
<!-- End of nyc01-01.fs.broadvox.net.xml -->
If you are behind a NAT or have a dynamic, public IP address, you may wish to enable registration. Registration is not required, even under a NAT scenario or a dynamic, public IP address scenario, but it is recommended. You may utilize a dynamic DNS record to support a dynamic, public IP address. You may utilize a static NAT or DMZ configuration on your firewall/NAT router to support a NAT configuration. Alternatively, Broadvox provides stun.fs.broadvox.net if you prefer to use STUN in a NAT configuration. Broadvox generally does not recommend the use of STUN. The Broadvox switch will perform automatic NAT traversal if it detects that you are behind a NAT. FreeSWITCH also has built-in NAT detection code through the UPnP or NAT-PMP functionality that may be built into your NAT router.
After configuring the gateways to Broadvox, you will need to configure your dialplan to route DIDs from Broadvox to your extensions. You can do this by creating a new XML file in your dialplan directory that provides a dialplan for the "broadvox-in" context:
cd /usr/local/freeswitch/conf/dialplan/
vim broadvox-in.xml
The contents of the XML file would look something like this:
include>
  <context name="broadvox-in">
    <extension name="unloop">
      <condition field="${unroll_loops}" expression="^true$"/>
      <condition field="${sip_looped_call}" expression="^true$">
        <action application="deflect" data="${destination_number}"/>
      </condition>
    </extension>
    <extension name="outside_call" continue="true">
      <condition>
        <action application="set" data="outside_call=true"/>
      </condition>
    </extension>

    <extension name="call_debug" continue="true">
      <condition field="${call_debug}" expression="^true$" break="never">
        <action application="info"/>
      </condition>
    </extension>

    <extension name="public_extensions">
      <condition field="destination_number" expression="^5552345678$">
        <action application="answer"/>
        <action application="play_and_get_digits" data="10 11 3 7000 # $${sound_prefix}/ivr/8000/ivr-enter_ext_pound.wav $${sound_prefix}/ivr/8000/ivr-that_was_an_invalid_entry.wav digits \d+"/>
        <action application="playback" data="$${sound_prefix}/ivr/8000/ivr-thank_you.wav"/>
        <action application="playback" data="$${sound_prefix}/ivr/8000/ivr-hold_connect_call.wav"/>
        <action application="set" data="continue_on_fail=true"/>
        <action application="set" data=" hangup_after_bridge=true"/>
        <action application="set" data="bypass_media=false"/>
        <action application="set" data="proxy_media=true"/>
        <action application="bridge" data="sofia/internal.domain.com/${digits}"/>
        <action application="playback" data="$${sound_prefix}/ivr/8000/ivr-im_sorry.wav"/>
        <action application="playback" data="$${sound_prefix}/ivr/8000/ivr-please_try_again.wav"/>
        <action application="respond" data="503"/>
      </condition>
    </extension>
  </context>
</include>
In this example, if the dialed DID matches 5552345678, the call is sent to a very basic IVR that simply gathers an extension from the calling party. It will then attempt to ring that extension on the internal Sofia SIP profile you have configured (assuming that internal.domain.com is a domain mapped to that internal profile through an alias). When the call is connected, the media will be transparently proxied through the FreeSWITCH server. On modern hardware, you should be able to run hundreds (if not thousands) of calls through the FreeSWITCH server in this manner.
This context will allow your DIDs to be routed to either specific users or to specific IVR systems. Four outbound dialing, you need to set up a similar context for your phones. You may use the default contexts provided by FreeSWITCH and simply customize them to suit your needs. When you finally need to bridge the call to Broadvox, you may use this Sofia dialstring:
<action application="set" data="hangup_after_bridge=true"/>
<action application="set" data="continue_on_fail=true"/>
<action application="set" data="originate_timeout=2"/>
<action application="set" data="originate_retries=1"/>
<action application="set" data="progress_timeout=15"/>
<action applicat="bridge" data="sofia/gateway/dfw01-01/${destination_number}|sofia/gateway/nyc01-01/${destination_number}|sofia/gateway/lax01-01/${destination_number}"/>
This dialstring will attempt the number on the Dallas gateway first. If it fails for any reason, it will attempt the NYC gateway next. If that also fails, then it will attempt the LA gateway. The actions prior to the dialstring instruct FreeSWITCH to allow 2 seconds for attempting each gateway with a maximum of one retries on each gateway before hunting to the next. In addition, it will timeout the call attempt on a gateway if no ringing is received within 15 seconds of the gateway notifying you that the call is being attempted. While a gateway outage should be extremely rare, this will make any gateway outage completely transparent to you. You may, of course, order the gateways however you like.
Attachments:
![]() Figure_1.png (image/png)
Figure_1.png (image/png)
![]() Broadvox_Figure_5.png (image/png)
Broadvox_Figure_5.png (image/png)
![]() Broadvox_Figure_1.png (image/png)
Broadvox_Figure_1.png (image/png)
![]() Figure_6.png (image/png)
Figure_6.png (image/png)
![]() Broadvox_Figure_6.png (image/png)
Broadvox_Figure_6.png (image/png)